For more tips and advice about CELTA, click here.
Giving Classroom Instructions
Join my telegram channel for teachers.
One of the most important skills for a teacher to master is that of giving clear classroom instructions. If these are unclear, students cannot possibly follow the lesson and therefore will not learn as much as they could. Worse yet, the learners are likely to become bored or frustrated, leading to all kinds of problems for the teacher.
Despite the clear importance of classroom instructions, many teachers neglect this aspect of their performance. These teachers may otherwise have a lot to offer and just a small amount of time spent on improving their classroom instructions would improve their lessons a lot.
Introduction
In addition to the verbal instructions we give, there are a number of other things we need to think about when giving instructions. To do this we will use some particular terminology.
Match the terms with the definitions:
1 Chesting
2 Modelling/demoing
3 ICQ
4 Gesture
5 Spatial anchoring
6 Graded language
a Movement of the hands (or other parts of the body) to indicate an instruction e.g. cupping a hand next to your ear.
b Holding a book or worksheet at chest-height for students to see.
c Using the same space in the classroom to give instructions.
d Questions to check understanding of instructions.
e Providing a demonstration of the activity.
f Where words and grammar have been deliberately simplified to be easily understood.
1. b
2. e
3. d – ICQ = Instruction Checking Question
4. a
5. c
6. f
Can I have your Attention, Please?
The first step in giving classroom instructions is to ensure we have our students’ attention. This is an increasingly difficult task for teachers as students have an ever increasing number of portable distractions. Nevertheless, if students are not paying attention to the teacher, there is little hope that they will have any idea what to do.
Teachers tend to develop their own strategies to do this – some of which may be more or less effective in different situations. Which students do you think would respond most positively to these different methods:
- The teacher puts a finger on his lips and a hand in the air. The teacher waits for all students to do the same.
- The teacher says “OK” and waits for everyone to pay attention.
- The teacher bangs a pen on a desk or on the board.
- The teacher recites a short series of instructions and does accompanying actions waiting for the students to join in, e.g. “point at the window, point at the door, point at the ceiling, point at the floor.”
- The teacher yells very loudly.
- The teacher moves to a particular spot in the classroom, or sits in a particular seat, from which he usually gives instructions.
- This is a typical primary school way to get students’ attention. It is unlikely to work with adults or teens.
- This is more appropriate for adults, and may be sufficient with well-behaved teen classes.
- As long as this is not too forceful, this may be appropriate for a teen or adult class.
- This is another primary school focussed way to get students’ attention.
- This is probably the worst way to get attention. The teacher gets a sore throat, the students get sore ears, the administration overhear and believe the teacher has lost control of the class.
- This is known as spatial anchoring and is surprisingly effective. The teacher does not need to say this is what he is doing. Students become conditioned to wait for instructions when the teacher gets to his spot.
Grading Language
One critical factor that determines whether students will understand the instructions is the language used to convey them. This not only means simplifying the words and grammar used, but also removing redundant language which may add to the ‘wall of sound’ which students receive.
Consider the instructions below. How could these be simplified?
1 Ok, if you wouldn’t mind, turn to page 32.
3 What I would like you to do is answer the questions.
5 Don’t worry if you can’t answer them all, have a go.
7 When your partner speaks, jot down some notes.
9 Do you understand all that? Any questions?
2 Let me just put these worksheets out of the way.
4 You don’t have to do all of the questions. You can do four, or maybe a few more.
6 I’m going to have you work in pairs for this activity.
8 Then, after you work in pairs, I think you should get up and mingle.
- If you wouldn’t mind is a conditional structure which is being used here for politeness. It may therefore be above the level of the students and is not critical to the instructions. A better instruction would be “Turn to page 32” or even just “Page 32.”
- Here the teacher is narrating what they are doing. This should be avoided because it is not helpful.
- “What I would like to do is…” is a cleft sentence. Again it adds unnecessary complexity in an attempt to be polite. “Answer the questions” is a much simpler and therefore better instruction.
- Four, or a few more is not a specific instruction. The teacher seems unclear what the students should do (so what chance have they got?). Combine with the previous instruction with a clear number e.g. “Answer questions one to four.”
- “Have a go” is likely to cause problems as students learn ‘go’ as a verb and may not know this use. We might also add that “don’t worry” may in fact increase anxiety about the questions. If they are too difficult – you shouldn’t be setting the activity.
- “I’m going to have you” is a causative sentence. Again this is not normally taught until high levels. “Work in pairs” with an appropriate gesture is sufficient.
- “Jot down some notes” will probably not be understood by many students. “Write notes” is the best option for the lowest levels but “make” or “take” is fine for higher levels.
- Firstly, there is no need to give this instruction now. Save it for later. “I think you should” again sounds uncertain. Finally, “mingle” is not a clear instruction. What does that mean students should do exactly?
- This is not a good way to check understanding. Students are primed to say “yes” to avoid looking stupid in front of their peers. They could also think they understand (but don’t). Instead we should ask Instruction Checking Questions (ICQs).
Using Gestures
One simple technique we can use to reinforce instructions, or possibly instead of verbal instructions, is to use gestures.
Think about how you can gesture to students that they should:
- open their books;
- close their books;
- listen;
- read;
- speak;
- write;
- be quiet (particularly young learners);
- work in a pair.
There are not really any wrong answers here, but the following suggestions might help:
To open books, put your hands together and open them so that the bottom of the palms remain together. To close, do the opposite.
To listen, put a cupped hand to your ear.
To read, pick up the book or worksheet and run your finger back and forth.
To speak, hold up one hand as though you have a puppet on the end. Put your fingers together and raise and lower them to your thumb.
To write, pretend you are holding a pen and that you are writing on your other palm.
To be quiet, put a finger to your lips. With adults you shouldn’t really need a signal. However, raising a hand to head height can be effective with a large or noisy class.
To indicate pair work you can point (with an open palm) at two students. Another way is to shake your own hand.
Modelling
If a picture is worth a thousand words, a demonstration is worth a million! Some activities are difficult to grasp purely from spoken instruction. The best thing we can do in this case is show what we want students to do. Of course, we don’t need to do it if it is a simple tasks students have done many times. However, the first time students do an unfamiliar task this is essential. This may even include where students are not accustomed to checking answers in pairs!
Consider the following task. How would you show students how to do it? (Note: the full task has not been reduplicated – the full task contains 16 role cards.)
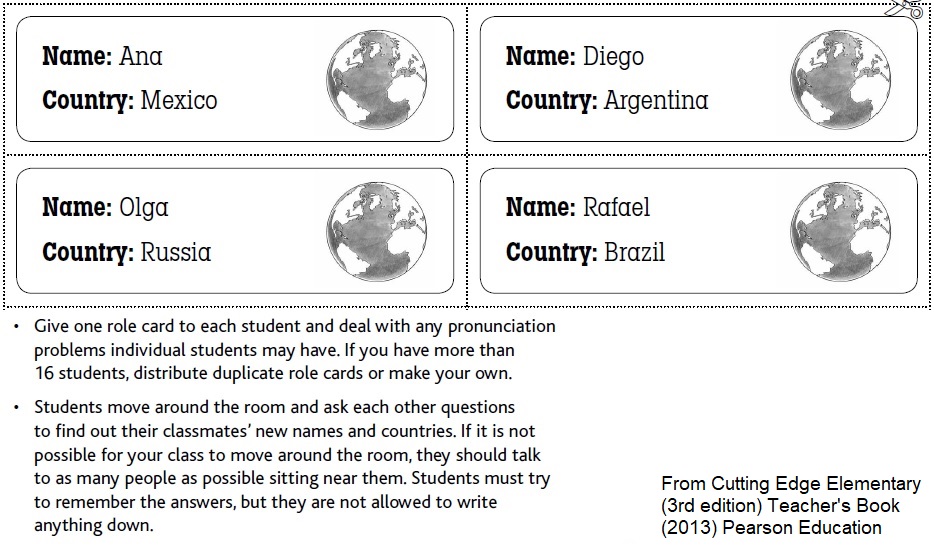
You may want to start by eliciting from students the questions which they need to ask. You can do this by writing on the board “name?” and drawing two lines before it e.g. ______ ______ name?
Give two strong students a role card (always try to use strong students in models) and take one for you. Get one student to ask you the two questions. Answer using the information on the card, then ask the same. Say “Nice to meet you, [name]!” Tap on your temple or forehead with your fingers while repeating their name and country to indicate memorising. Now turn to the next student and ask the questions.
Instruction Checking Questions (ICQs)
Another useful technique for giving instructions is to use ICQs. These are simple, (normally) closed questions which ensure students know what they are supposed to do. For example:
- How many people will you hear? (Before a listening)
- Do you write or say your answers?
- Who do you tell the answer?
Good ICQs avoid patronising students by not asking about the obvious. If students are looking at a reading passage in their book, you will insult their intelligence if you ask “Are we reading or listening?” ICQs should instead be used to clear up aspects of the task that may go wrong.
Consider the activity above. What ICQs would you ask to help students understand what they need to do?
One problem which might occur is that students say their own name and country, not what is on the card. Therefore you could ask “Do you say your name, or the name on the card?”
Another common problem with this activity is students don’t change partners. You can therefore ask “Do you speak to one person or many people?”
Handouts
If using handouts, it is advised not to give these out until you have given the instructions. If students need to see them, you can:
- Chest them (hold them at chest height for students to see);
- Project them (if you have the technology);
- Give them out only as you need to.
Bringing it all together - G.A.D.I.M.U.S
Several years ago, while working on my own instructions, I came up with the mnemonic device GADIMUS to remember 7 important stages of giving instructions.
Get the students’ attention.
Announce the type of activity which is coming;
Divide the students into their pairs/groups (or tell to work on their own);
Give clear, concise and graded Instructions;
Model the activity;
Check students Understand what they are supposed to do;
And finally, give a Signal for students to start.
If you follow this model, you can’t go far wrong. That said, not every activity will require all of these steps i.e. modelling and checking understanding may only be necessary with unfamiliar activities to students. Whenever you are doing something that you or your students have not done before, it is a good idea to script your instructions in advance of the lesson. This increases your chances of giving better instructions when in the classroom.

